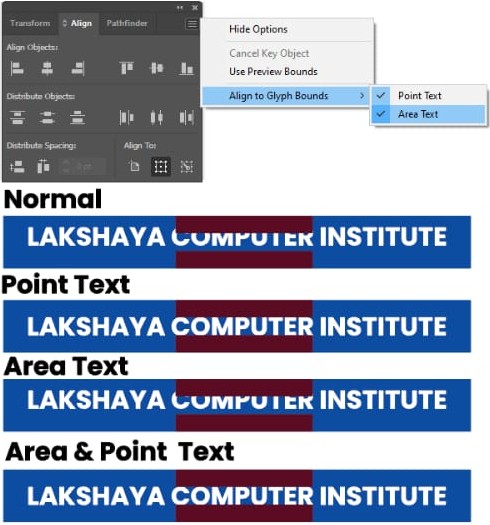
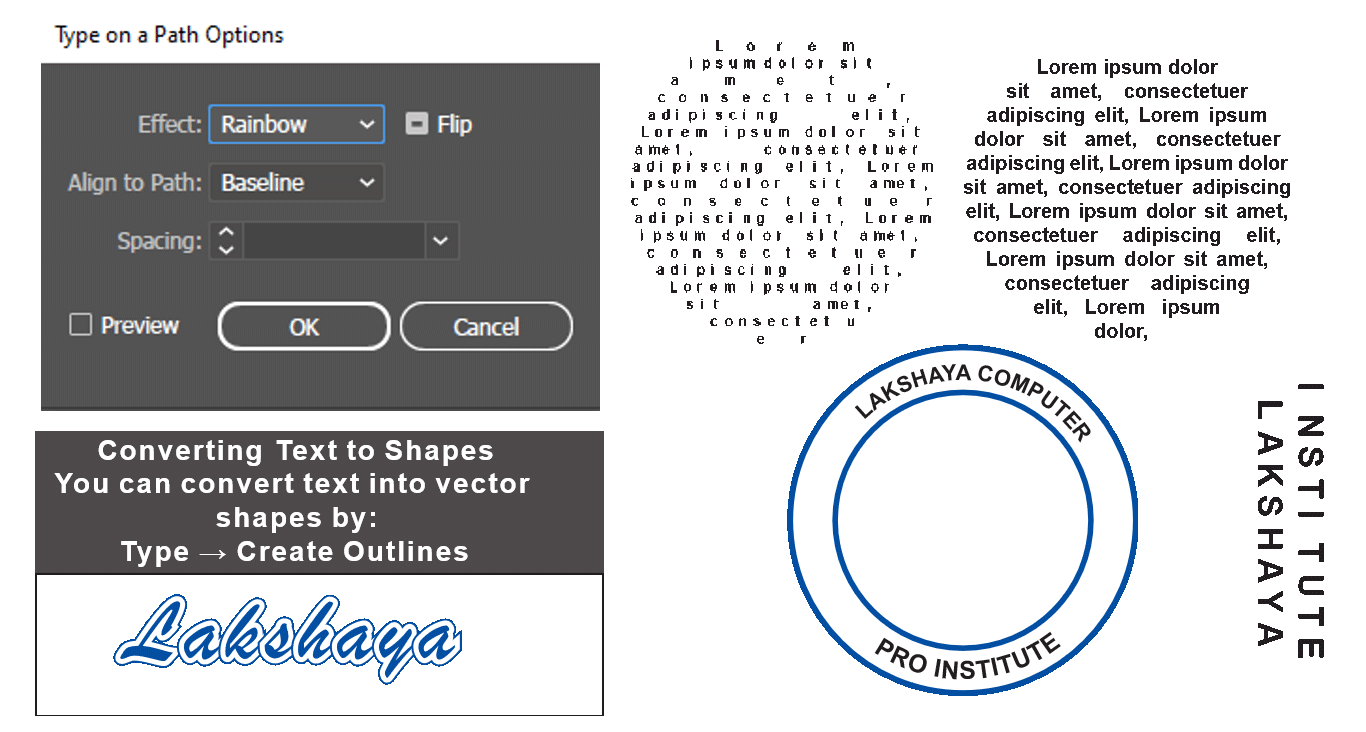
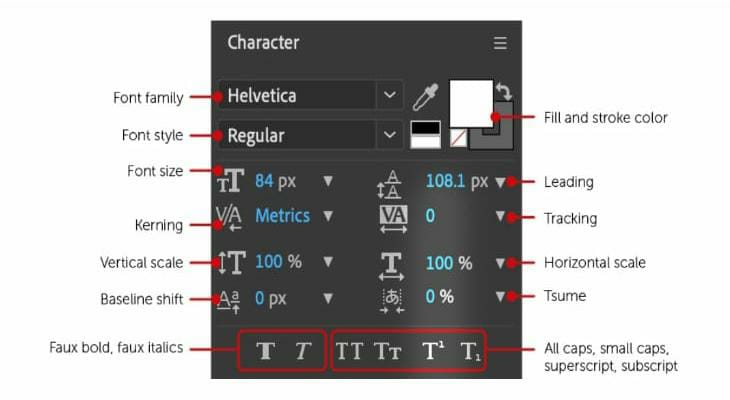
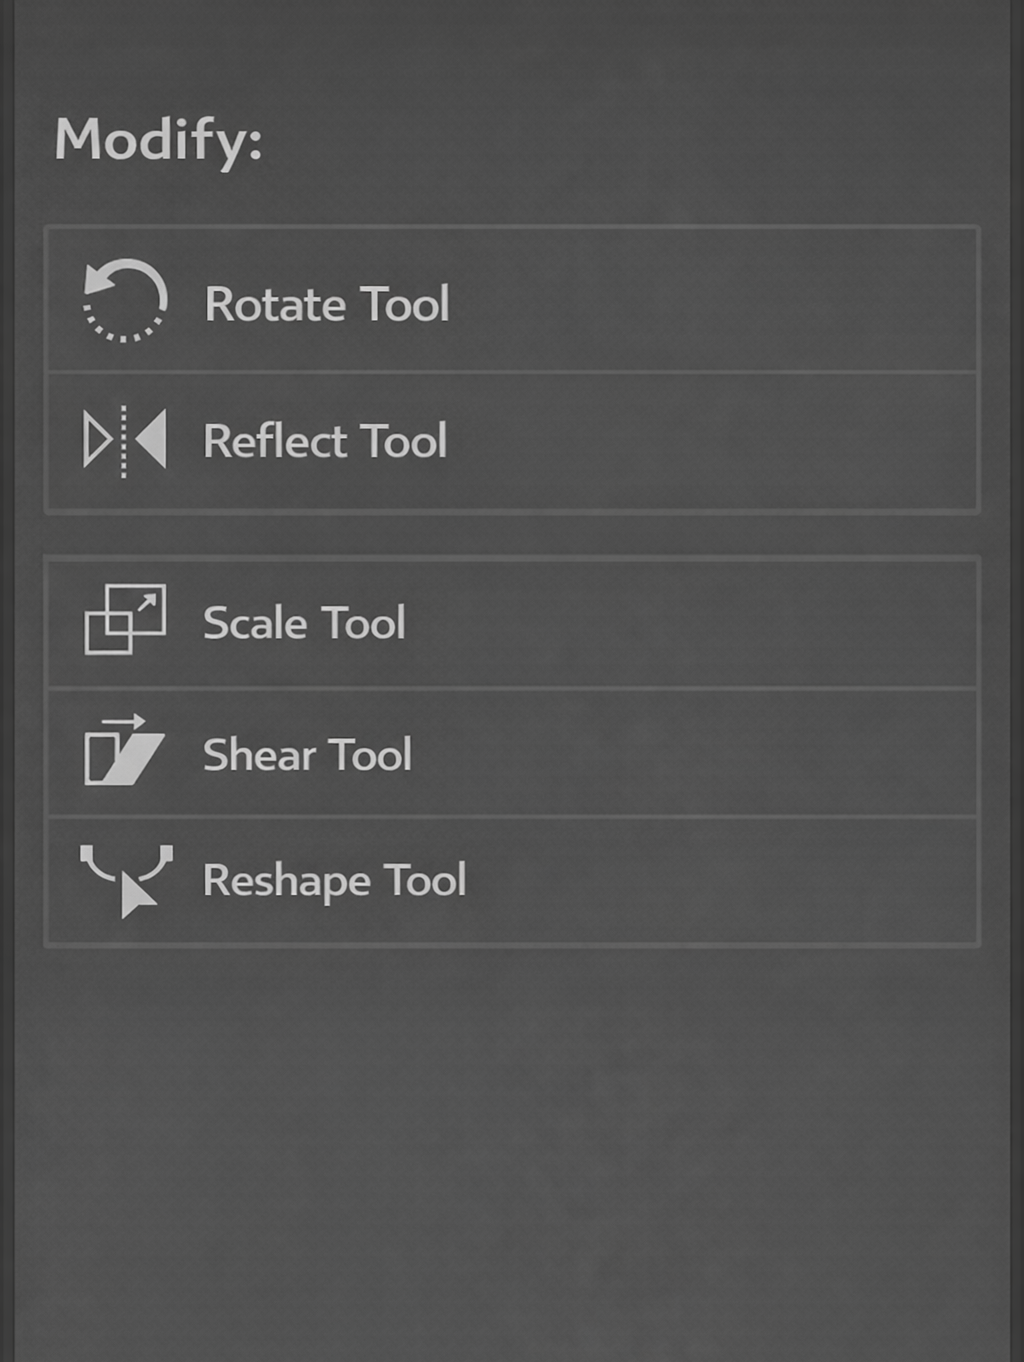
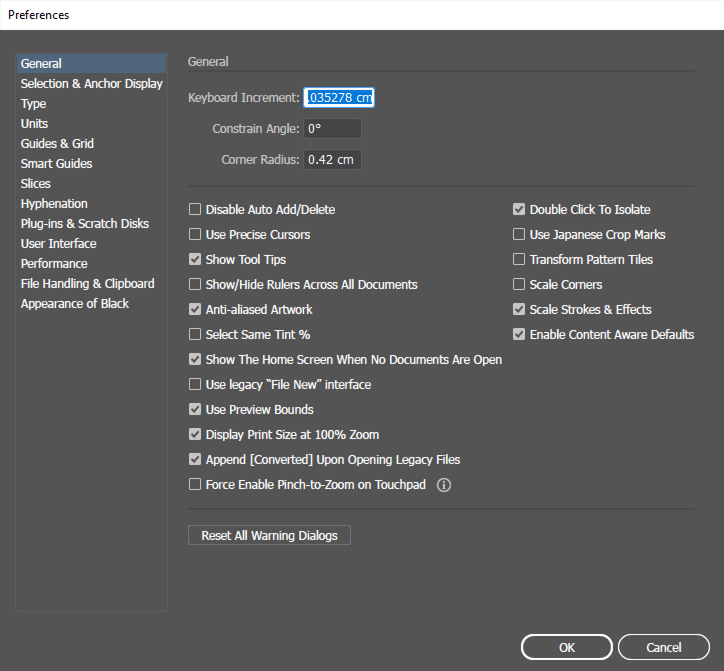
Adobe Illustrator

Upgrade Your Skills: Beginner to Advanced

With Neeraj Sir

Introduction to Illustrator

Adobe Illustrator is a professional vector graphics design software used to create logos, icons, illustrations, typography, infographics, and print designs.

Illustrator is widely used in:

Logo & Brand Design

Packaging
Design

Poster & Print Design

Social Media Graphics

Web &
UI Assets

Vector vs Raster Graphics

Vector Graphics
  • Made using points, paths, curves, and shapes
  • Resolution-independent (no pixelation)
  • Best for logos, icons, typography
  • Smaller file size (usually)
  • Editable at any time
  • Examples: AI, SVG, EPS files
Raster Graphics
  • Made of pixels
  • Resolution-dependent
  • Quality reduces when enlarged
  • Best for photos and detailed images
  • Examples: JPG, PNG, GIF, PSD files
  • Illustrator mainly works with vector graphics.

Color Modes in Graphic Design

  • RGB (Red, Green, Blue) – Used for screens (websites, apps, digital art). Bright & vibrant.
  • CMYK (Cyan, Magenta, Yellow, Black) – Used for PRINTING (posters, brochures). Often looks duller than on screen.

Global Color

A color wheel is a circular diagram showing relationships between colors (primary, secondary, tertiary). It helps designers understand how colors mix, contrast, and harmonize.

RED

LOVE
ENERGY
ATTENTION

YELLOW

JOY
INTENSITY

GREEN

NATURE
SAFETY
FRESHNESS

BLUE

STABILITY
TRUST

PURPLE

ROYALTY
WEALTH

Interface Overview

When you open Illustrator, you will see

Artboards & Workspaces

Artboards

  • Act like multiple pages in one file
  • Used to create different versions of a design
  • Can be resized, duplicated, or rearranged
  • Example: Creating social media posts for Instagram, Facebook, and LinkedIn in one file.

Workspaces

  • Pre-arranged panel layouts for specific tasks
  • Examples: Essentials, Typography, Painting
  • Can be customized and saved
01Tools Panel
Located on the left side Contains drawing, selection, shape, text, and editing tools.
02Properties Panel
Shows settings for selected objects (color, stroke, size, effects).
03Artboard Area
The white working area where you create designs.
04Control Panel
Quick access to frequently used settings.
05Layers Panel
Organizes objects for better workflow and editing.

File Formats in Illustrator

AI

Native Illustrator file

Fully editable

EPS

Used for print and logo sharing

Compatible with other design software

PDF

Used for printing and client sharing

Maintains layout and fonts

SVG

Used for websites and UI design

Lightweight and scalable

PNG

Transparent background supported

Used for web and social media

JPG

Compressed image format

Best for photos and web previews

Selection Tool (V)

Used to select entire objects

Move, resize, rotate objects

Apply colors, strokes, and effects

Used for general object manipulation

Selection Tool = whole object

Direct Selection Tool (A)

Used to select anchor points and path segments

Modify shape structure

Adjust curves and corners

Fine-tune designs precisely

Direct Selection Tool = part of object

ADVANCE TOOL

Shape Tools

Illustrator provides ready-made shapes:

  • Rectangle Tool
  • Ellipse Tool
  • Polygon Tool
  • Star Tool
  • Rounded Rectangle Tool
    Note:-
  • Hold Shift to create perfect squares or circles.
  • Hold Alt/Option to draw from the center.

Pen Tool (P)

  • Most powerful drawing tool in Illustrator
  • Creates custom shapes using anchor points
  • Two types of points:
  • Corner points (sharp angles)
    Smooth points (curves using handles)
  • Click = straight lines
  • Click + Drag = curved lines

ADD ANCHOR POINT TOOL

Used to add a new anchor point on an existing path so you can shape it more precisely.

Now point C lets you bend or adjust the line.

DELETE ANCHOR POINT TOOL

Used to remove unnecessary anchor points to simplify the shape.

ANCHOR POINT TOOL

Used to change the type of anchor point.

Tool shortcut: Shift + C

  • Corner point → Smooth curve
  • Smooth curve → Corner point

CYRVATURE TOOL

Shortcut : Shift + ~

The Curvature Tool is used to draw smooth curved lines easily by clicking point. Illustrator automatically creates the curve between the points.

ERASER TOOL

Eraser Tool is used to erase parts of a vector object by dragging over it, just like using an eraser on paper.

SCISSOR TOOL

The Scissors Tool is used to cut a path at a specific anchor point or location. Instead of removing parts, it splits the path into two separate paths.

Tool shortcut: Shift + C

KNIFE TOOL

The Knife Tool is used to cut objects into multiple pieces by drawing a line across them.

  • It works like cutting paper with a knife.
  • The object becomes two separate shapes.

Line Segment Tool

The Line Segment Tool is used to draw straight lines between two points.

  •   Press Shift Draw perfectly horizontal, vertical, or 45° lines
  •   Press Alt Draw line from the center outward
  •   Click on Artboard Opens Line dialog box to enter exact length and angle.

Arc Tool

The Arc Tool is used to draw curved line segments (arcs) instead of straight lines.

  •   The Arc Tool is used to draw curved line segments (arcs) instead of straight lines.
  •   Press Shift Constrain arc angles

Spiral Tool

The Spiral Tool creates spiral shapes that curve inward or outward.

  •   Up/Down arrow Increase or decrease Spiral Segment.
  •   Press Ctrl Adjust spiral decay (tightness)

Rectangular Grid Tool

The Rectangular Grid Tool creates a grid made of rows and columns.

  •   Right Arrow      Add more columns
  •   Left Arrow      Remove columns
  •   Up Arrow      Add more rows
  •   Down Arrow      Remove rows

Polar Grid Tool

The Polar Grid Tool creates circular grids with rings and radial lines.

  •   Up Arrow      Add circular ring
  •   Down Arrow      Remove rings
  •   Right Arrow      Add Radial Lines
  •   Left Arrow      Remove Radial lines

Use Shape Builder tool & Pathfinder panel

Use Shape Builder tool, Rotate tool & Art Brush

Use Shape Builder tool, Transform effect & Art Brush

Shift + Ctrl + Alt + J = Align + Join

Join     Connects two open path endpoints into one path.

Used for closing shapes or connecting lines.

Average     Aligns selected anchor points

Useful for straightening uneven points

Outline Stroke     Converts a stroke line into a filled shape.

Now the stroke becomes a vector shape you can edit with anchor points.

Line Segment Tool
  • Draws straight lines
  • Can adjust stroke weight, color, and style
  • Used for dividers, outlines, and structure
Fill & Stroke
    Fill
  • The inside color of a shape
  • Can apply solid color, gradient, or pattern Stroke
  • The outline/border of a shape
  • Can adjust:
  • [Weight (thickness)]

    [Style (dashed, dotted)]

    [Color]

Project-1

What You'll Be Creating

Summer is a great season to uncover your bike and go cycling down the road! There is still a whole summer month ahead, so let’s take a ride through the exciting process of creating of a flat-style children's bicycle in Adobe Illustrator, using simple shapes, options from the Stroke panel, and various Pathfinderoperations. Let’s start!

Project-2

What You'll Be Creating

Summer is a great season to uncover your bike and go cycling down the road! There is still a whole summer month ahead, so let’s take a ride through the exciting process of creating of a flat-style children's bicycle in Adobe Illustrator, using simple shapes, options from the Stroke panel, and various Pathfinderoperations. Let’s start!

Gradient

A gradient in Adobe Illustrator is a gradual, smooth transition between two or more colors, or between different tints/shades of the same color, applied to fills or strokes. Used to add depth, volume, and lighting to vector objects, gradients are managed via the Gradient panel and Gradient tool.

Project

Make a Digital Web Cam

Grouping (Ctrl + G)

Combines multiple objects into one unit

Move, scale, or rotate them together

Ungroup anytime (Shift + Ctrl + G)

Alignment Tools

Align objects precisely using the Align Panel:

Align Left / Center / Right

Align Top / Middle / Bottom

Distribute Spacing evenly

Pathfinder Tool

The Pathfinder Panel combines or modifies shapes to create new ones.

Main Options:
  • Unite → Merge shapes into one
  • Minus Front → Subtract top shape from bottom
  • Intersect → Keep overlapping area only
  • Exclude → Remove overlapping area

Project

Note: Tools and Commands Used
  •   Pathfinder (Join option): Used to merge and combine different shapes effectively.
  •   Join Tool: Used to manually join and smooth open endpoints of paths.
  •   Join Command (Object > Path > Join): CTRL+ J Applied to connect open paths accurately
  •   Scissor Tool: Used to cut specific anchor points and modify shapes where necessary.
  •   Reflect Tool: Utilized to create symmetrical elements within the design.
  •   Expand Command (Object > Expand): Used to convert strokes and applied effects into editable vector shapes for final refinement.
What the Type Tool Does

The Type Tool lets you:

  •   Add point text (click and type)
  •   Add area text (type inside a shape or text box)
  •   Add text on a path (text that follows a line or shape)
  •   Format text (font, size, spacing, alignment, color)
  •   Convert text into outlines (vector shapes)

Types of Type Tools in Illustrator

When you click and hold the Type Tool (T) in the toolbar, you’ll see several options:

1. Type Tool
  •   Click once to create Point Text
  •   Click and drag to create Area Text
2. Area Type Tool
  •   Converts a closed shape into a text container
  •   Text stays inside the boundaries of the shape
3. Type on a Path Tool
  •   Lets text follow a path (circle, curve, line, etc.)
4. Vertical Type Tool
  •   Creates vertical text (commonly used in some Asian typography styles)
5. Vertical Area Type Tool
  •   Vertical text inside a shape
6. Vertical Type on a Path Tool
  •   Vertical text along a path
7. Touch Type Tool (What It Does)
  •   The Touch Type Tool allows you to:
  •   Select and adjust individual letters in a word
✏️ Important Text Features

Using the Character Panel and Paragraph Panel, you can adjust:

  •   Font style
  •   Font size
  •   Leading (line spacing)
  •   Kerning (space between letters)
  •   Tracking (space across a group of letters)
  •   Alignment

Shortcut 1

Shortcuts

V

A

Y

T

M

L

P

B

N

E

R

O

Shift+C

Shift+w

Tool

Selection Tool

Direct Selection Too

Magic Wand Tool

Type Too

Rectangle Tool

Ellipse Tool

Pen Tool

Brush Tool

Pencil Tool

Free Transform Tool

Rotate Tool

Reflect Tool

Anchor Point Tool

Width Tool

Shortcuts

Ctrl + N

Ctrl + O

Ctrl + S

Ctrl + Shift + S

Ctrl + P

Ctrl + Q

Action

New File

Open File

Save

Save As

Print

Exit Illustrator

Shortcut

Ctrl + Z

Ctrl + Shift + Z

Ctrl + C

Ctrl + X

Ctrl + V

Ctrl + G

Ctrl + Shift + G

Action

Undo

Redo

Copy

Cut

Paste

Group

Ungroup

Shortcut 2

Shortcuts

Ctrl + +

Ctrl + _

Ctrl + O

Ctrl + 1

Ctrl + Y

Ctrl + H

Ctrl + ;

Action

Zoom in

Zoom Out

Fit Artboard

Actual Size

Outline Mode

Hide Edges

Show/Hide Guides

Shortcut

Space

Ctrl + Space

Alt + Mouse

Tab

Action

Hand Tool (Move canves)

Zoom in tool

Zoom

Hide/Show Panels

Shortcuts

Ctrl + ]

Ctrl + Shift + ]

Ctrl +[

Ctrl + [

Action

Bring Forward

Bring to Front

Send Backward

Send to Back

Shortcut

X

Shift + X

D

/

Action

Switch Forward

Swap Fill & Stroke

Default Fill & Stroke

Remove Fill or Stroke

What You'll Be Creating

Summer is a great season to uncover your bike and go cycling down the road! There is still a whole summer month ahead, so let’s take a ride through the exciting process of creating of a flat-style children's bicycle in Adobe Illustrator, using simple shapes, options from the Stroke panel, and various Pathfinder operations. Let’s start!

Basic Transformations

    Used to adjust object position and size:
  • Move – Drag or use Move Tool
  • Scale – Resize proportionally (hold Shift)
  • Rotate – Rotate around anchor point
  • Reflect – Mirror object horizontally/vertically
  • Shear – Slant object

Shape Builder Tool

The Shape Builder Tool (Shift + M) allows interactive shape creation.

    How it Works
  • Select multiple overlapping shapes
  • Drag across areas to merge them
  • Hold Alt/Option to delete unwanted parts
    Advantages:
  • Faster and more visual than Pathfinder
  • Easy for beginners
  • Great for logo and character design

Clipping Masks & Compound Paths

    Clipping Mask
  • Hides parts of objects using a top shape
  • The top object acts as a “mask”
  • Only visible area inside the mask remains
  • Image inside text
  • Photo inside shapes
  • Creative design effects

Compound Path

  • Combines objects to create “holes” or cut-out effects
  • Works differently from grouping
  • Makes overlapping shapes act as one object
    Used for:
  • Text cutouts
  • Logo knockouts
  • Complex vector shapes
    Mastering object editing tools allows you to build professional, clean, and complex vector designs efficiently.
    If you want, I can next create:

  • Practice exercises for this module
  • Or convert this into short bullet-slide version for cleaner presentation design

🧩 Slide: Advanced Drawing & Illustration

ADVANCED PEN TOOL TECHNIQUES

The Pen Tool is the most powerful tool in Illustrator for precise vector drawing..

KEY TECHNIQUES

  • Adjusting Bezier handles for smooth curves
  • Converting corner to smooth points
  • Adding and deleting anchor points
  • reating closed and open paths

USED FOR:

  • Logo Design
  • Character illustration
  • Custom icons
  • Vector Tracing
💡 Mastery of the Pen Tool gives full control over shape creation.

BLOB BRUSH TOOL

Blob Brush Tool

  • Draws filled shapes instead of strokes
  • Merges same color shapes automatically
  • Best for freehand illustrations

Pencil Tool

  • Draws freehand paths
  • Editable like Pen Tool
  • Can smooth lines automatically

Paint Brush Tool

  • The Paintbrush Tool is used to draw freehand paths with brush strokes.
  • The path remains editable.

Pattern Creation

Illustrator allows you to create repeating patterns easily.

Pattern Features:

  • Create seamless repeating tiles
  • Adjust spacing and layout
  • Save patterns in Swatches Panel

Used For:

  • Textile design
  • Backgrounds
  • Packaging
  • Surface design

Pattern Types:

  • Brick by Row
  • Brick by Column
  • Hex

Image Trace

The Image Trace feature converts raster images into vector artwork.

How It Works:

  • Import a JPG or PNG
  • Apply tracing preset (Black & White, Logo, High Fidelity Photo)
  • Expand to convert into editable paths

USED FOR:

  • Converting sketches to vector
  • Logo recreation
  • Digitizing drawings
These advanced tools allow designers to move from basic shapes to professional-level illustrations and complex vector artwork.

If you'd like, I can now prepare the next slide:

Effects & 3D Tools (Warp, Blend, 3D & Materials, Envelope Distort, etc.)


Here is your next slide content (Effects & 3D Tools) — detailed, structured, and ready to copy into your presentation:

Slide: Effects & 3D Tools

3D & Materials

Illustrator’s 3D & Materials panel allows you to create realistic depth and dimension.

Used For:

  • 3D logos
  • Product mockups
  • Icons with depth
  • Realistic text effects

👉Adds professional and modern visual appeal to designs.

Warp & Distort Tools

These tools reshape objects creatively without manually editing anchor points.

Warp Tool:

  • Push, pull, twist, or reshape objects
  • Great for organic designs

Used for:

  • Creative typography
  • Abstract backgrounds
  • Stylized illustrations

Distort Options:

  • Free Distort
  • Pucker & Bloat
  • Roughen
  • Zig Zag
  • Twist

Envelope Distort

Envelope Distort reshapes objects by wrapping them into another shape.

Methods:

  • Make with Warp
  • Make with Mesh
  • Make with Top Object

Used for:

  • Bending text into shapes
  • Perspective effects
  • Mockups (logo on packaging)
👉 Very useful for branding presentations.

Blend Tool

The Blend Tool creates smooth transitions between two or more objects.

Features:

  • Blend shapes
  • Blend colors
  • Control number of steps
  • Create smooth gradients between objects

Used For:

  • Gradient-style effects
  • Line transitions
  • Abstract art
  • Background effects
>

Stylize & Effects Panel

The Effects Panel adds non-destructive visual enhancements.

Common Effects

  • Drop Shadow
  • Inner Glow
  • Outer Glow
  • Feather
  • Gaussian Blur

Advantages:

  • Editable anytime
  • Does not permanently alter shapes
  • Enhances depth and realism
>

Logo & Branding Design

Principles of Logo Design

A logo is a visual identity symbol that represents a brand.

Key Principles
01

Simplicity

Clean and easy to
recognize

02

Memorability

Unique and
impactful

03

Scalability

Works at small and
large sizes

04

Versatility

Looks good in color and
black & white

05

Relevance

Matches brand
personality

Grids improve accuracy and visual consistency.

Grid Systems in Logo Design

Grids help maintain balance and proportion.

Benefits:

Symmetry & Alignment
Structured Designs
Visual Harmony
Professional Look

Types of Grids:

Square Grid
Circular Grid
Golden Ratio Grid
💡 Pro Tip: Grids improve accuracy and visual consistency across all platforms.

Icon Design

Icons are simplified graphic symbols.

Characteristics

Minimal details
Clear shapes
Consistent stroke weight
Balanced proportions

Used for

App design
Websites
UI systems
Brand assets

Logo Styles & Variations

Icons are simplified graphic symbols.

Different types of logos

Minimal details
Clear shapes
Consistent stroke weight
Balanced proportions

Used for

App design
Websites
UI systems
Brand assets

Brand Presentation & Mockups

Presenting logos professionally is essential.

  • Logo concept explanation
  • Color palette
  • Typography
  • Logo usage guidelines
  • Mockups (business cards, packaging, signage, social media)

Presentation increases client trust and perceived value.

Exporting Logo Packages

Deliver logos in multiple formats:

  • AI (Editable master file)
  • EPS (Print compatibility)
  • PDF (Sharing & preview)
  • SVG (Web use)
  • PNG (Transparent background)
  • JPG (Quick preview)

Always provide organized, properly named files for clients.

Slide: Professional Workflow & Productivity

Artboard Management

Artboards allow you to create multiple designs in one file.

Key Features:
  •   Add, delete, and duplicate artboards
  •   Resize artboards for different platforms
  •   Organize multiple versions of a design
  •   Rename artboards for clarity

Used for:
  •   Social media post sets
  •   Logo variations
  •   Multi-page brochures
  •   UI screens

Keeps projects organized and efficient.

Global Colors

Global Colors update everywhere when edited.

Benefits:
  •   Maintain brand consistency
  •   Change entire color scheme instantly
  •   Save time in revisions
  •   Avoid manual recoloring

Used for:
  •   Brand identity projects
  •   Client revisions
  •   Large design systems

Essential for professional branding work.

Asset Export Panel

The Asset Export Panel helps export multiple objects quickly.

Features:
  •   Drag objects into export panel
  •   Export in multiple formats at once
  •   Choose different sizes (1x, 2x, 3x)
  •   Save for web or mobile apps

Used for:
  •   App icons
  •   UI design elements
  •   Social media graphics

Speeds up production workflow.

Keyboard Shortcuts & Customization

Using shortcuts improves speed and productivity.

Examples:
  •   V → Selection Tool
  •   A → Direct Selection Tool
  •   P → Pen Tool
  •   Ctrl/Cmd + G → Group
  •   Ctrl/Cmd + Z → Undo

You can also:
  •   Customize shortcuts
  •   Create personalized workspace layouts

Professionals rely heavily on shortcuts to work faster.

Actions Panel

The Actions Panel automates repetitive tasks.

Uses:
  •   Record steps once
  •   Replay with one click
  •   Batch process multiple files
  •   Save time on repetitive work

Examples:
  •   Resize images
  •   Apply consistent effects
  •   Export settings

Automation increases efficiency and consistency.

Creative Cloud Libraries

Libraries store reusable design assets.

Can Save:
  •   Colors
  •   Logos
  •   Graphics
  •   Text styles
  •   Brand elements

Benefits:
  •   Access across devices
  •   Share with team members
  •   Maintain brand consistency

Essential for team-based and large-scale projects.

Slide: Advanced Illustration Techniques

Vector Portrait Creation

Vector portraits are scalable, editable illustrations of people or characters.

Key Techniques:
  •   Start with a reference photo
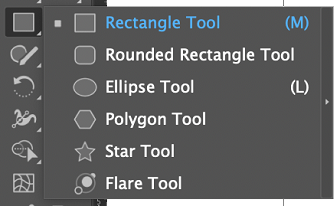
  •   Use Pen Tool for outlines
  •   Apply shapes for shadows and highlights
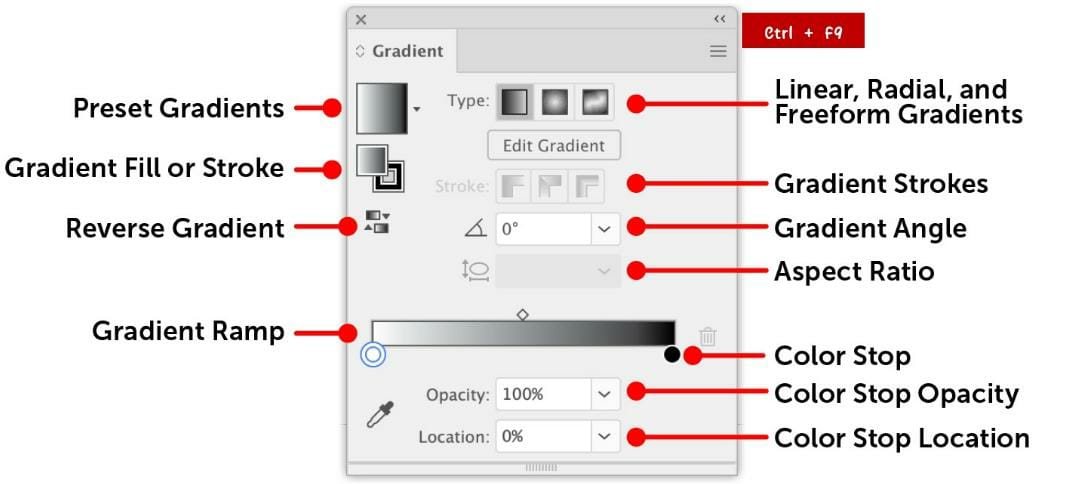
  •   Use gradient fills and blending for realism
Used for:
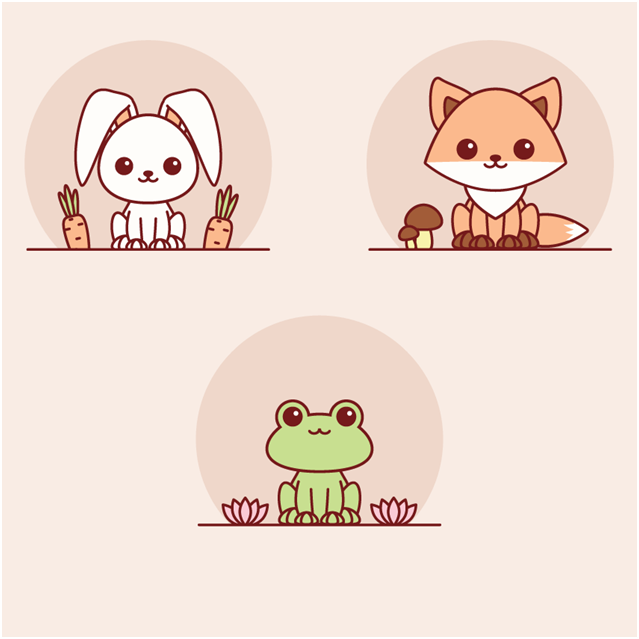
  •   Character illustrations
  •   Profile icons
  •   Marketing visuals
  •   Posters

Vector portraits remain sharp at any size and are fully editable.

Isometric Design

Isometric design creates 3D-like visuals on a 2D plane.

Features:
  •   Uses 30° grid for depth
  •   Objects maintain proportion without perspective distortion
  •   Ideal for icons, infographics, and technical illustrations
  •   Shows multiple sides of an object clealy
Used for:
  •   UI/UX mockups
  •   Infographic design
  •   Game assets
  •   Architectural illustrations

Adds depth and clarity while maintaining vector simplicity.

Infographic Design

Infographics communicate data visually.

Key Elements:
  •   Charts & graphs
  •   Icons & symbols
  •   Color-coded sections
  •   Typography hierarchy
Used for:
  •   Shape Builder Tool
  •   Pen Tool
  •   Symbols for repeated elements

Transform complex data into visually appealing, easy-to-understand graphics.

Packaging Design Layout

Illustrator is widely used for product packaging.

Key Steps:
  •   Design dielines (cut and fold lines)
  •   Apply logos, graphics, and text
  •   Use grids for alignment
  •   Preview 3D mockups
Used for:
  •   Food packaging
  •   Cosmetics
  •   Retail products

Ensures designs fit perfectly when printed and folded.

Technical Drawing

Technical drawings require precision and accuracy.

Features:
  •   Uses grid and snapping tools
  •   Accurate measurements
  •   Clean vector lines
  •   Layers for organization
Used for:
  •   Engineering diagrams
  •   Architectural plans
  •   Schematics
  •   Product design

Transform complex data into visually appealing, easy-to-understand graphics.

Advanced Gradient Mesh

Gradient Mesh allows realistic color blending and shading.

How It Works:
  •   Create a mesh over an object
  •   Assign colors to individual mesh points
  •   Blend colors smoothly for realism
  •   Adjust mesh points to control shading
Used for:
  •   Photorealistic illustrations
  •   Detailed objects (fruits, bottles, faces)
  •   High-end design projects

Ensures designs fit perfectly when printed and folded.

Realistic Vector Rendering

Combine all advanced tools for realistic, professional artwork.

Techniques:
  •   Blend Tool for smooth transitions
  •   Gradient Mesh for shadows & highlights
  •   3D effects for depth
  •   Layer management for complex illustrations
Used for:
  •   Advertising visuals
  •   Editorial illustrations
  •   Product mockups

Mastering these techniques elevates Illustrator skills from professional design to high-end illustration and realistic vector art. high-end illustration and realistic vector art.

If you want, I can now continue with thenext topic: Print & Production and make it ready for slides.

Here is the next topic: Print & Production — detailed, structured, and ready to copy into your presentation:

Print Settings & Bleed

Bleed ensures designs print correctly without unwanted borders.

Key Points:
  •   Add bleed area (usually 3–5mm) around design
  •   Ensures color/images extend beyond trim edges
  •   Set up in Document Setup
  •   Prevents white edges after cutting
Used for:
  •   Posters
  •   Flyers
  •   Business cards
  •   Packaging

CMYK vs RGB for Print

CMYK (Cyan, Magenta, Yellow, Black)
  •   Used for printing
  •   Color mixing produces accurate printed colors
  •   All print-ready files must be in CMYK
RGB (Red, Green, Blue)
  •   Used for screens
  •   Brighter colors for web, social media, and digital displays
Converting RGB to CMYK ensures printed colors match design intent.

Preflight & Packaging Files

Preflight checks prevent printing errors.

Preflight Checklist:
  •   Correct color mode (CMYK)
  •   Fonts outlined or embedded
  •   Linked images included
  •   Layers organized
Packaging Files:
  •   File → Package
  •   Collect fonts, linked images, and AI file
  •   Create a ready-to-deliver folder for the printer

Working with Spot Colors

Spot colors are pre-mixed inks used for consistent brand colors.

Key Uses:
  •   Logos requiring exact color
  •   Brand-specific colors (Pantone Matching System)
  •   Reduces ink variation
Spot colors ensure brand integrity in print materials.

Preparing Files for Clients

Deliver professional, print-ready files.

Recommended File Formats:
  •   AI – Master editable file
  •   PDF – High-quality print-ready file
  •   Include bleed and crop marks
  •   Provide instructions for printers
Professional packaging ensures client satisfaction and minimizes printing errors.

Mastering print and production workflow ensures Illustrator designs are accurate, scalable, and ready for professional printing.

If you want, I can now create the Final Projects slide, ready-to-copy, to complete your syllabus presentation.

Here is the final topic: Final Projects — detailed, structured, and ready to copy into your presentation:

Slide: Final Projects

Logo Design Project

  •   Create a professional logo using Illustrator tools
  •   Apply color theory, typography, and branding principles
  •   Include multiple variations (color, black & white, horizontal/vertical)
  •   Use grids and alignment for precision

Social Media Post Design

  •   Design engaging social media graphics
  •   Apply brand colors, typography, and layout principles
  •   Use templates for multiple platforms (Instagram, Facebook, LinkedIn)
  •   Include visual hierarchy and balance

Poster Design

  •   Create a poster for print or digital use
  •   Combine typography, imagery, and vector elements
  •   Apply composition rules, contrast, and readability
  •   Include bleed and print-ready setup

Brand Identity Mini Project

  •   Design a mini brand kit: logo, colors, typography, and icons
  •   Apply the brand across business cards, packaging, and social posts
  •   Ensure consistency across all assets
  •   Present professionally for client or portfolio

Portfolio Presentation

  •   Compile all projects into a cohesive portfolio
  •   Include high-quality exports of logos, illustrations, and designs
  •   Use slides to showcase your design process and final outputs
  •   Prepare for sharing with clients or employers

Learning Outcome

  •   Apply all Illustrator skills from basic tools to advanced techniques
  •   Demonstrate professional workflow, design thinking, and creative problem-solving
  •   Build a portfolio ready for real-world design projects

If you want, I can now compile all these slides into a fully structured, ready-to-paste presentation outline with consistent formatting, so your entire “Adobe Illustrator: Basic to Advanced” syllabus is slide-ready.

Do you want me to do that?

That was the final topic in your syllabus. The “Next” after Final Projects would be the conclusion or course wrap-up slide. Here’s a ready-to-copy version for your presentation:

Slide: Course Wrap-Up & Takeaways

Key Takeaways

  •   Mastered Adobe Illustrator from basic to advanced
  •   Developed skills in vector drawing, typography, and color management
  •   Learned professional workflow, object editing, and advanced illustration techniques
  •   Prepared files for print, web, and branding projects

Recommended Next Steps

  •   Build your personal design portfolio
  •   Practice real-world projects like logos, posters, and infographics
  •   Explore Illustrator plugins and AI tools to enhance workflow
  •   Join design communities for feedback and inspiration

Final Message

  •   Adobe Illustrator skills open doors to graphic design, branding, UI/UX, and illustration careers
  •   Consistent practice + application = professional-level design expertise
  •   Keep experimenting, exploring, and creating!

This slide works as a course closing slide, giving students a summary and next action steps.

If you want, I can now combine all the slides we created into a complete, fully structured slide outline — ready to paste into any AI slide maker or PowerPoint — so you’ll have the entire syllabus from Module 1 to Final Wrap-Up in one place.

Do you want me to do that?

Preferences

If you want, you can change or customize different settings in Preferences according to your needs.

General

  •   Contains basic settings of Illustrator.
  •   Examples: keyboard increment, selection tolerance, and object selection by path.

Selection & Anchor Display

  •   Controls how anchor points and paths appear.
  •   You can change anchor size and selection display.

Type

  •   Related to text settings.
  •   Includes options like smart quotes, font preview, and text behavior.

Units

  •   Used to set measurement units.
  •   For example: pixels, inches, millimeters, or points.

Guides & Grid

  •   Controls the appearance and spacing of guides and grids.
  •   Useful for precise alignment.

Smart Guides

  •   Shows alignment hints while moving objects.
  •   Helps with snapping and measurement labels.

Plug-ins & Scratch Disks

  •   Manages temporary storage and plug-in related settings.
  •   Helps improve performance.

File Handling & Clipboard

  •   Controls how files are saved, opened, and copied between applications.

Appearance of Black

  •   Controls how black color appears on the screen and in print.

User Interface

  •   Allows you to customize the look of the software.
  •   You can change brightness, panel appearance, and canvas color.

Shortcut to open Preferences: EditPreferences or press Ctrl + K

Packaging Design

Packaging Label